InfluxDB is an open source time-series database highly optimized for storing time data, such as data from sensors inserted in the IoT environment. Through this database, the data stored can be monitored and analyzed, and extra parameters such as mean, variance, etc., can be calculated automatically
In this tutorial you will see how to install InfluxDB on your Server with Ubuntu 20.04.
First, connect to your server via an SSH connection. If you haven't done so yet, following our guide is recommended to connect securely with the SSH protocol. In case of a local server, go to the next step and open the terminal of your server.
Installation
InfluxDB can be installed by directly querying the official repositories of this tool. First, add them to your list, by typing the following commands:
sudo curl -sL https://repos.influxdata.com/influxdb.key | sudo apt-key add -
sudo echo "deb https://repos.influxdata.com/ubuntu bionic stable" | sudo tee /etc/apt/sources.list.d/influxdb.list
sudo echo "deb https://repos.influxdata.com/ubuntu bionic stable" | sudo tee /etc/apt/sources.list.d/influxdb.list
sudo apt update
Once the list of repositories has been updated, proceed with the installation of InfluxDB using the command:
sudo apt install influxdb
Once installed, check the status of the service via:
sudo systemctl status influxdb

If, when typing this command, a result similar to the one shown in the screenshot above appears, the tool has been correctly installed, but is not running yet.
To start it and make sure that the service is always available every time the machine is restarted, type the command:
sudo systemctl enable --now influxdb
In this way, not only will it start on the spot, but it will be reloaded every time the server is restarted. To start it manually, run, as an alternative to the command shown above, the following:
sudo systemctl start influxdb
To stop the execution of InfluxDB use the command:
sudo systemctl stop influxdb

Configuring InfluxDB
The InfluxDB configuration file is located by default in the /etc/influxdb/influxdb.conf folder.
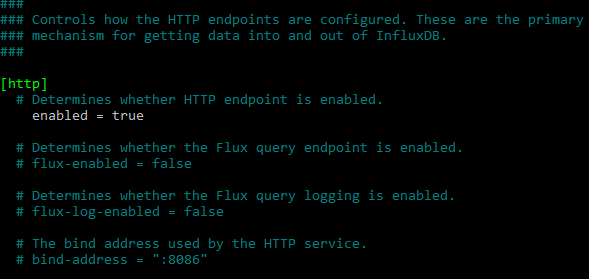
Many features are commented out. To enable them, simply open the configuration file and delete the "#" symbols from the relevant line.
To modify the configuration file use the command:
sudo nano /etc/influxdb/influxdb.conf
For example, to access via HTTP request (enabling endpoints), uncomment the "enabled" item in the "http" section, as shown in the following screenshot:

When the necessary changes are made, close and exit using the key combination CTRL + X / Y / Enter.
To apply the changes, the service has to be restarted. This operation that can be carried out using the commands described above:
sudo systemctl stop influxdb && sudo systemctl start influxdb
As with any database, after the installation the first thing to do is to create an administrator account. This can be done using the following command:
curl -XPOST "http://localhost:8086/query" --data-urlencode "q=CREATE USER admin WITH PASSWORD 'password' WITH ALL PRIVILEGES"
Clearly replace:
- admin: with the user name;
- password: with the password for the database login.
Once the account is created, access the InfluxDB shell by using the command:
influx -username 'admin' -password 'password'
N.B. also in this case, the “admin” and “password” parameters have to be replaced with those previously declared.

In addition to running queries directly from the shell, your queries can be submitted to InfluxDB by using
tools such as "curl". The syntax to respect is the following:
curl -G http://localhost:8086/query -u ADMIN_NAME:PASSWORD_NAME --data-urlencode "q=QUERY"
Again, replace:
- "ADMIN_NAME" with the name of the user created;
- "PASSWORD_NAME" with the password associated with that user;
- “QUERY” with the query to be executed.
For example, to access with the data used in this tutorial and view all the databases present, the command to execute would be:
curl -G http://localhost:8086/query -u admin:password --data-urlencode "q=SHOW DATABASES"
N.B. If the InfluxDB database is queried from a machine other than the one where the server is installed, instead of ‘localhost’, enter the IP address of the machine to query.

Enabling the Firewall
Since InfluxDB can also be queried from the outside, it may be necessary to update the firewall rules to allow it to connect.
If your firewall is UFW just type the following commands:
sudo ufw allow 8086/tcp
This will allow TCP traffic on port 8086 used by InfluxDB for querying the database from outside.